How to Apply Stickers
How to apply stickers
Your stickers are gold – don’t blow it and apply them badly! Many people are not sure how to apply stickers – they can be a bit tricky to apply well, but if you follow our step-by-step guide it should help you to apply your stickers the right way, like a pro.
Step 1 – Prepare your surface.
This is really important – so important that we have a whole blog post about how to prepare your surface for stickers. In short, give the surface a really good clean, removing any dirt, dust, hair and any sticky bits that might be left over from a previous sticker.
Step 2 – Place your sticker.
Pick a location for your sticker. Measure it and double check! You don’t want to go to the effort of applying a sticker only to find that it is off-centre or not quite where you wanted it. If you are really keen you can tape it in place so it doesn’t move, with a line of tape over the centre of the sticker, like a hinge. This is particularly helpful for large or long stickers like the one below.

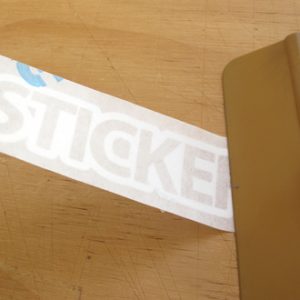
Step 3 – Peel the sticker from the backing paper. Stop 1/3 to 1/2 way.
Peel the backing paper off the sticker carefully. Fold it over itself, and watch for parts that may stick. If they do, just push the app tape back down and retry. Stop one third to halfway.

Step 4 – Cut away the backing paper.
Cut away the part of the backing paper that you have just exposed.

Step 5 – Apply the first half of your sticker.
Working from the centre out, using a credit card or a hard rub with your hands, push the sticker into position and rub it hard!

Step 6 – Remove the other half of your backing tape.
Remove the other half of the backing paper by folding the unattached part and peeling it off carefully, exposing the sticker surface. As with step 3, fold it over itself, and watch for parts that may stick. If they do, just push the app tape back down and retry.

Step 7 – Apply the second half.
Using the same method as before, work the second half of the sticker down and into position. Hold the sticker tightish and work from the centre to the end. If you don’t have a squeegee like we’re using in this pic, you can use a credit card or the side edge of a ruler – that will usually do the trick.

Step 8 – Rub your sticker like you love it!
Rub it hard to make sure it will stick properly! This also helps remove any bubbles that might be lurking below.

Step 9 – Remove the application paper!
Starting at the top corner of your sticker, carefully peel back the application tape. Fold it over on itself, and slowly pull on a 45 degree angle to the sticker. You’d be surprised at how many people don’t know they need to do this step, and leave the application paper in place covering up their sticker! If you learn nothing else from this “how to apply stickers” guide, please do us a favour and learn this:

Step 10 – Keep pulling!
Slowly keep pulling back the app tape until it is all removed. Watch for parts of your sticker lifting – if it does then re-rub that part of the sticker with the app tape over it and try again slowly. If it isn’t working, try different angles. DO IT SLOWLY!

Step 11 – Bask in your glory!
You have done it! Your new sticker is now on and hopefully looking mint!

If you have any other burning questions check out our FAQS page or get in touch – we’re always happy to help!